Posts

Showing posts with the label tutorial

Icelandic Bind-Off Tutorial

Image
The Icelandic Bind-Off is a relatively easy bind off to work and gives a stretchy edge. It creates a slightly rounded and bulky edge, so works quite well when used with garter stitch.  It closely resembles the Twisted German Cast-On, so can be paired with this, if matching edges are important in your project. Here's a video tutorial for the Icelandic Bind-Off and for those that prefer a photo tutorial, just scroll on down. 1. Knit the first stitch. 2. Slip back to left-hand needle without rotating the stitch. You can leave the right-hand needle tip in at the front. If it comes out, then just re-insert the right-hand needle in this stitch purlwise.  3. Whilst still in that first stitch, insert the right-hand needle into the second stitch on the needle and pull it through the first stitch. There should just be one strand on the right-hand needle at this point. 4. Knit this strand. 5. Take the two stitches off the left hand needle. Repeat steps 2 - 5 until all stitches have b...
Substituting Yarn in a Project

Image
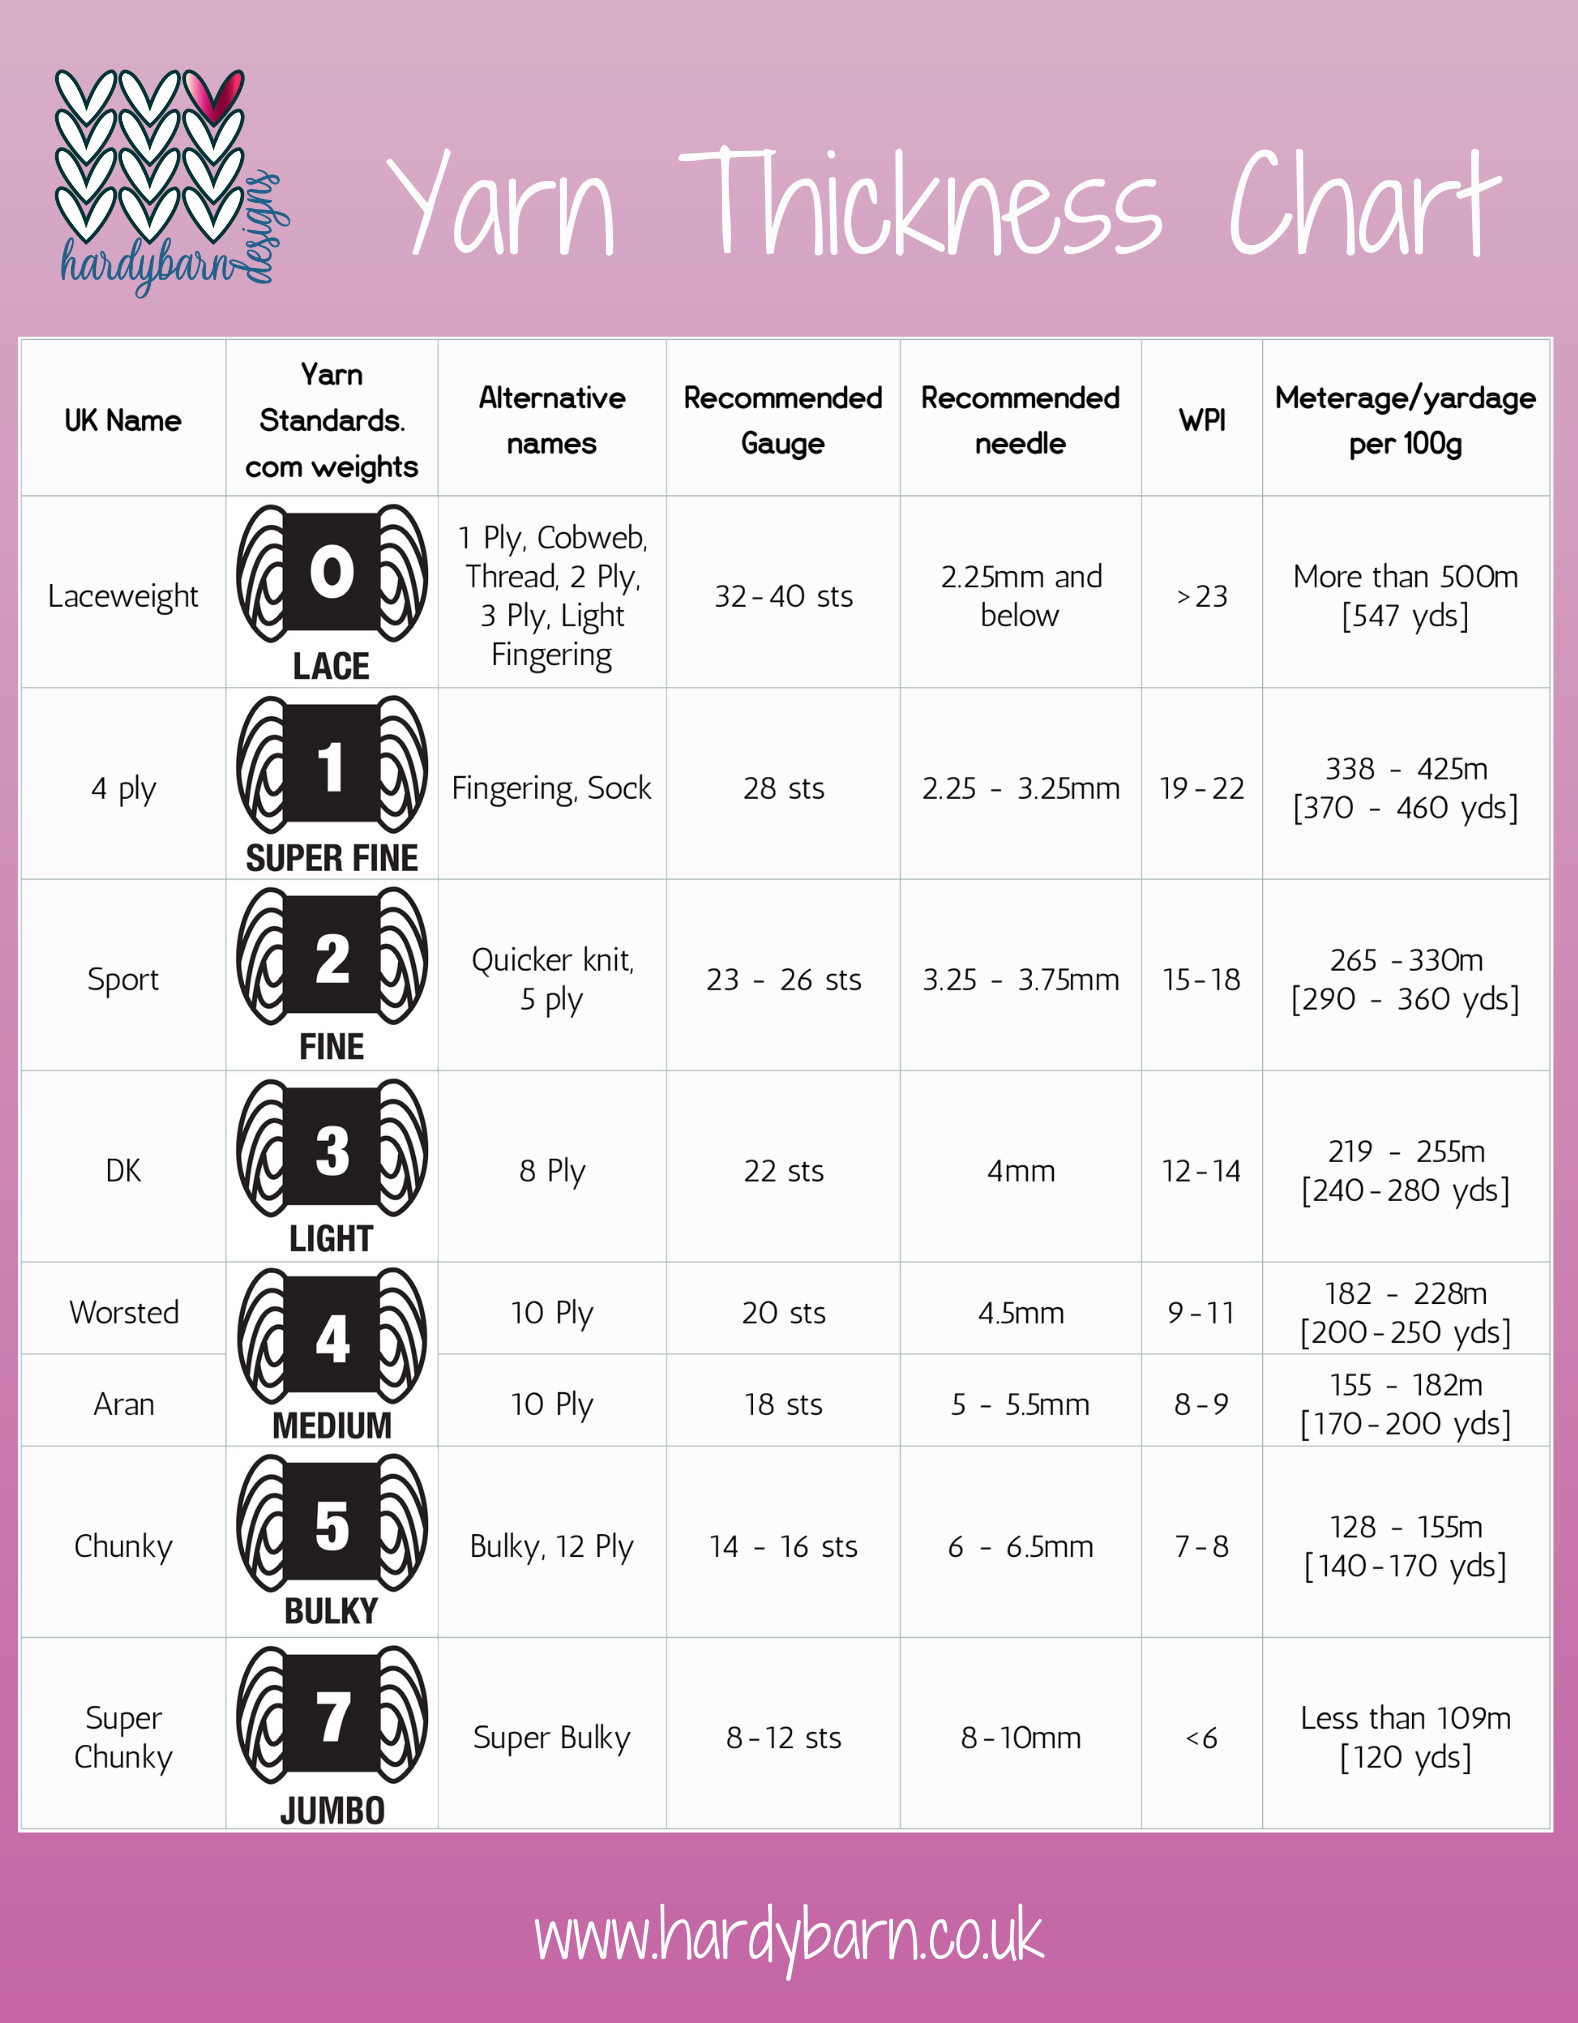
So you’ve chosen your pattern, but either you don’t want to use the recommended yarn or you can’t find it to buy. This does not mean you are stuck. Many knitters, especially when they are just learning to knit, get stuck on the idea that you can only use the yarn that the pattern is written with. There are, occasionally, a few projects where it can be quite hard to find an alternative but that is very rare. There are a few factors that you want to think about when changing yarn.  Yarn Thickness The main one is the thickness of the yarn. This is the one factor that you absolutely have to consider. Everything else that I discuss below helps to hone your decision down but yarn thickness is at the core of a project. If you use a thicker yarn, it could make the fabric too dense and often make it impossible to match the gauge of the pattern. If you use a thinner yarn, then it will be more open and airy than intended; there’s more scope with this but some projects such as toys an...

Afterthought Heels

Image
I don't know whether you're the same but I've always been disappointed with the fit of an afterthought heel. I think this is because I have a very high instep and the heel just isn't deep enough. I'm going to talk a bit about "maths and fit" in this first section, but if you're looking for the tutorial on how to put in your afterthought heel then just slide down to the bottom. Afterthought heel fit I played about with the maths a bit to see why they don't work for me. My heel diagonal is about 30cm [11 7/8"]. You'd expect to have a bit of negative ease around the heel diagonal - 10 -15% is a good range - so I want it to be somewhere between 25.6 - 27cm [10.1 -10.7"] in circumference.  If I were to work a basic afterthought heel, that outside measurement would be about 12.5cm [5"] (I worked out this number by counting the rows in the afterthought heel and multiply by 2; plus the width of the final kitchener stitches) plus half of ...

Tutorial: M1L and M1R Increases

Image
So your pattern tells you to increase at both ends of the row, but it fails to tell you how. There are quite a number of different ways to create increases in knitting and some will suit different situations better than others. Today I'm going to talk about one of the lifted increases - make one left or right.  Make one left (m1l) and make one right (m1r) are mirror images of each other, so are perfect when you need to make two increases on the same row. If you want to see the details of the swatch below, just scroll to the bottom of the post. Benefits Blend into the knitting more than a lot of other increases Don't create large holes under the stitch, so are neater They are mirrored versions, so look good worked in pairs Downsides Can be a little tricky (tight) to work sometimes but does gets easier with practice As it's a lifted increase, they pull up the stitches from below, which can cause distortion Other increases can be faster to work  Here's the video tutorial b...

21 Uses for Stitch Markers in Knitting

Image
I love my stitch markers. I've been posting images of all the uses for stitch markers on Instagram/Facebook and I'll be putting them all together in this blog post, so it's easy to refer back to.  Stitch Marker Use #1 - Mark the beginning of the round This one is fairly obvious use. If working in the round, you need to know where the beginning is. Where to put the marker: On the needles is easiest. Just be careful not to knit them in, by making sure that any extra part of the stitch marker is on the opposite side to your yarn when you work past it. If you struggle with knitting in your markers, round ones are best. Stitch Marker Use #2 - Written in the Pattern As with my pattern, Barque , a lot of patterns include the use of markers in the instructions. A clear pattern will tell you when to place them, when to slip them and when you can take them out again. Designers use markers in the instructions to simplify the pattern. I could spell out to you every row or I can just sa...